
Are you ready to learn how to start an online store? Maybe you just came up with a wonderful product/service idea and now you’d like to see if people are willing to buy it.
Well, you’re in luck, because you no longer have to be an experienced web developer to build a store online and you will have yours in just 20 minutes.
Shopify is hands-down the easiest way when building an online store.
Whether you want to make a little extra money on the side or make it your full-time job, Shopify is the fastest way to get online and start selling.
Why Shopify? 5 Reasons To Consider
There are almost 500 different solutions for e-commerce. Some of them provide a wide range of service with all the bells and whistles. Others support only basic features. The choice of the platform for an online business should be responsible and pondered.
I recommend Shopify because is the most complete and best all-round e-commerce platform. It powers over 600,000 online stores and has over 1 million active users worldwide. More than $72 billion has been sold on Shopify – so it must be doing something right! Let’s find out the strong sides of this e-commerce platform.
- Admin Control: Shopify has a very intuitive control panel for users with a variety of options for store management and inventory control. It supports more than 50 payment gateways. It accepts credit cards and different currencies, configuration in several languages, functions to optimize SEO and create marketing campaigns.
- Unlimited Bandwidth: This means that you can add as many products as you want in your store. There is no limitation on how many online visitors go through your store, and also how many files or photos you upload to it.
- Design: It has an impressive collection of more than 100 beautiful and professional templates. All the templates can be customized with no efforts and special skills. The user-friendly editor helps to change the look of a web store without any HTML and CSS knowledge. Shopify also allows being in a trend of mobile shopping with a build-in mobile storefront.
- Support and Security: It has the option 24/7 support for any problem that may arise and the possibility of using an instant chat. It also uses SSL (Secure Socket Layer) technology to protect payment information of your customers.
- Applications: Shopify has a wide variety of applications that help you have better control of your store and make it much more interesting for your customers. If you want a new functionality you can download and install one from the Shopify App Store.
Sounds Great Right!
Also, I have to mention that like any other e-commerce platforms, Shopify charges a monthly fee starting from $29 the basic plan to $299 the most advanced. But believe me, I have built multiple online stores for drop shippers and local businesses and the basic plan is all you are going to need!
But there’s a 14 days FREE trial and you don’t need to enter any card details until you go live. You’re free to play around until then.
Ok. Having that said, let’s get to the fun part, shall we!
How to Create Your Online Store in 20 Minutes
Step 1 Sign Up
In this tutorial, we’ll go through the basic stages of setting up a Shopify store. We’ll look at signup, design, adding products, adding a domain name and setting up the payment mechanism.
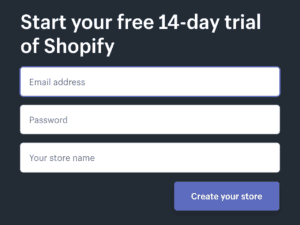
First, click here to get your 14 days FREE trial. Then click on the Get Started button. Fill in your desired email address, password and store name.
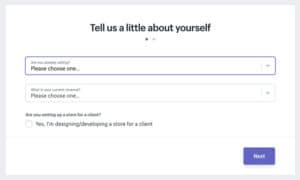
After you click Next, tell Shopify about yourself by specifying how much you plan to sell and if you’re already selling. Click on the Enter My Store button when complete.
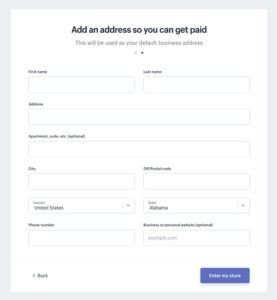
The following page asks you to fill in personal information such as your name, address and phone number, all of which is used to configure currencies and tax rates. You can change this later if you want.
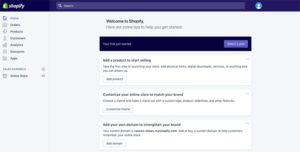
After that, you will be redirected to the main dashboard.
Step 2 Select your Theme
Shopify has more than 100 themes to customize your online store. Think of them as a starting point, you can amend the layouts, colors, and images as you go through.
Make sure to take your time choosing the right theme for your business, because once you choose it and set up everything in it, if you change it later you will have to customize the store from scratch again.
To go to the Theme library, click “Online Store”, “Themes” and then “Visit Theme Store”.
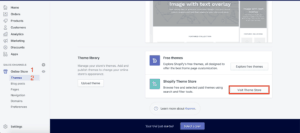
Once you are there, you will find a numerous amount of themes categorize by Industries. Explore a bit until you find the ideal one.
If you are on a budget you can find Free Themes as well. I suggest you go for “Venture” or “Supply”, I’ve used them before and they work really good, have everything a business need when starting and are super easy to use.
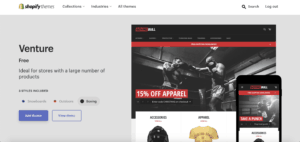
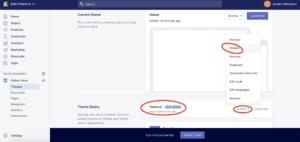
Once you’ve chosen a free theme, click “install”. Shopify doesn’t publish the theme by default, so it’s important that you click “actions”, “publish theme” on the next page.
Step 3 Customize Your Store
To start customizing your Shopify store, you’ll need to click “online store” in the side navigation and then select “themes”. You’ll then want to click on “customize”.

After you press the button, you will get into the customize menu that is divided by “sections” where you are going to structure your website, and “theme setting” where you can edit the color, the typography, the favicon, and your social media.

There a number of ways that you can customize your Shopify store, but my recommendation would be to get started by following these steps:
1. Add a logo
Click “header” and upload your logo. If you haven’t created a logo for your Shopify store just yet, you can head on over to Fiverr here you will find freelances around the world that can help you get one made pretty cheaply, and not just that, here you will find different kind of works offers from anything you can imagine.
And if you are struggling or don’t have enough time to create your store, you can find someone to make it for you.
2. Add images
Click back to the customize menu and select “slideshow”. Here you can upload your brand or product images to your Shopify store. These images should be in line with your product niche and should give your users a clear idea about what it is you’re offering.
If you’re not sure what images to use, you can get professional images without copyright problem in Unsplash or Pixabay.
“Once you’re done, always remember to click “save”, because if you exit the customize menu without save you will lose all the progress.”
3. Add Collection
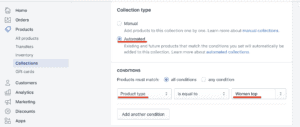
If you are going to have several types of product, first you have to create collections. Go to Shopify main menu, click on “products”, “collections” and then “create collection”.
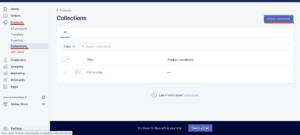
Then you just have to put a name to the collection and an image that represents it.
But the most important part is that in the collection type select “automated” and then put a “condition” by “product type”. I recommend that the condition be the same name as the collection because this will help you to add each of your products automatically to the collection you want them to be.
4. Add Products
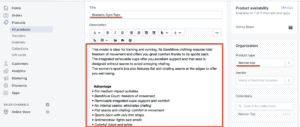
To add your first product. Go to Shopify main menu, click on “products” then “add product”.

Enter the name and description. Don’t skip the product description. A good description is essential if you want to convince customers to buy your goods. Choose your words carefully and make the product stand out!
A unique product description is also essential for better rankings in search engines.
Also, in the “product type box”, enter the condition of the collection where you want to add your product.
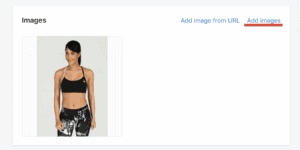
Next, upload images of your product. Take in mind that images can make or break your sales rate. Great photos are key to convincing customers to buy from you, so choose them carefully.
To do that, just scroll down from the description section, press the “add images” button and simply choose your images.
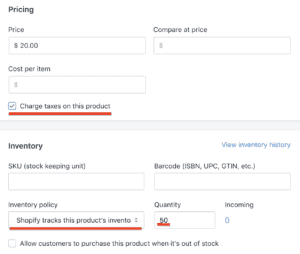
After, enter the price of your product and be sure to tick the ‘charge taxes’ box. Shopify will automatically add the correct sales tax based on your location.
IMPORTANTLY, keep the inventory policy box to “Shopify tracks this product’s inventory” and enter the number of products you have available. This way, Shopify tracks how many products have been sold, and how many are left.
Finally, if your product comes with different options, like a t-shirt in different sizes, Shopify will handle this for you. Just tell it what sizes, colors or fabrics are available for each product.
Just scroll down and in the variants section add the options you need.
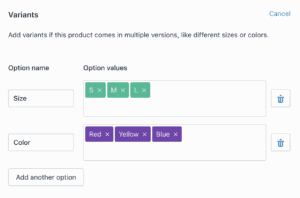
Hit “save” and your product is automatically added to your store-front. Repeat the process for each product you’re selling.
How To Add Products For Dropshipping Business Model.
If you are doing dropshipping, the add product process is a bit different than for a normal business model.
You will have to add the Oberlo Chrome Extension, an AliExpress Product Importer for Shopify, a really great tool for dropshipping in general.
- It will sort out products with the ePacket delivery option
- Show you the handling time for the product in advance
- Show you if the shipping is free.
This extension is a real time-saver, as you won’t have to check the search result’s products one by one., all the shipping information the supplier provides is right in front of you.
Step 4 Get a Domain
The domain name is the address where Internet users can access your website e.g. “www.google.com”.
Shopify provides you a domain but I don’t recommend you to use it because it doesn’t look good and it is not professional at all.
To go to the domain section. In the main dashboard click on “online store” then “domains”. In there you will see the options “connect existing domain”, “transfer domain” and “buy new domain”.
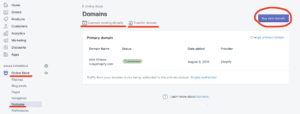
If you already have a domain you can easily add it. But if you don’t yet own a domain name, Shopify allows you to see what’s available and buy it right there but it tends to be pricer.
Instead, I suggest to get yours in GoDaddy. In my opinion, it has the best prices in the market and is super easy to get one.
Step 5 Get Your Payment Providers
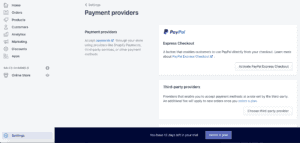
Before one of the trickiest things about setting up an online store was taking payments. Luckily, Shopify makes this easy too. Go to “settings” then “payments providers” and start by choosing your preferred method.
The simplest option is Paypal, but in the “third-party providers” section, you can also choose “Shopify Payments”, which allows you to accept credit cards directly (without using PayPal as a middle man). But if it is not allowed in your territory I recommend you to use “Stripe” or “2checkout” instead.
If you have another payment method in mind, you can choose other “alternative payments” including GoCoin, BitPay, and CoinBase.
DONE! You Are Ready To Make Money!
Your online store is ready to go live to the world.
If you’ve followed the steps in this Shopify tutorial for beginners article, you’ll have all the information you need to get started.
Please do share how you get on in the comments below. If you’ve already set up a Shopify store, let me know about your experience with the platform.
Take action and start your free trial with Shopify today!
One Response
Like!! Really appreciate you sharing this blog post.Really thank you! Keep writing.