


Step 2.B) Choose a Web Hosting Plan
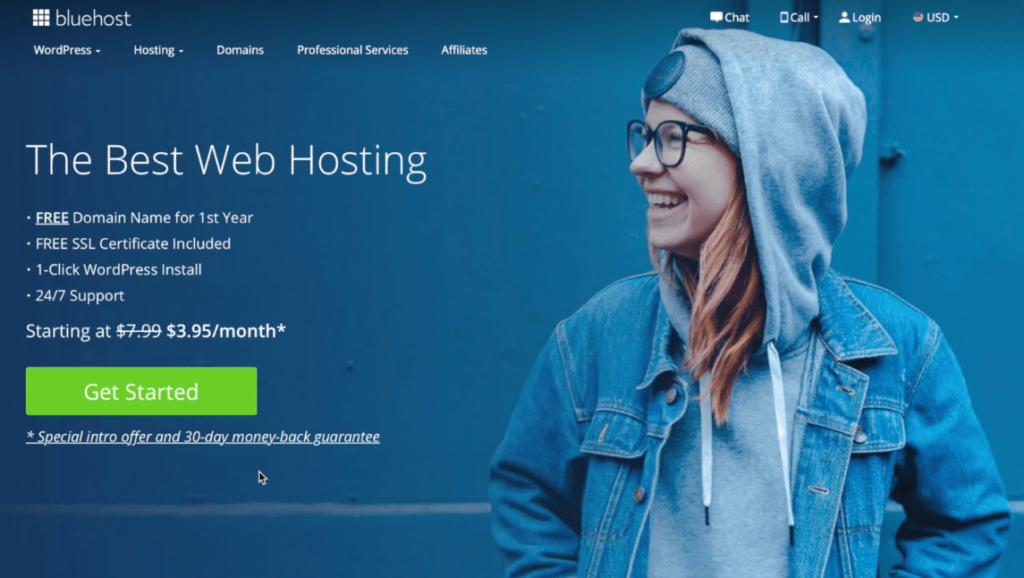
Click on the “Get Started” button and you’ll be taken to a pricing page where you will need to choose a plan for your website. If you’re only planning to have one website, I would suggest going with the “Basic plan” of $3.95. This is the most affordable plan online today!
The “Plus”, “Choice Plus” and “Pro” plans are good if you plan on having multiple websites, but to start, just stick with the basics.

Also, BlueHost can do free migrations if you aren’t happy with your current host or looking for a change.
Step 2.C) Choose a Domain name
Once you choose the plan, on the next screen, you’ll be asked to select a new domain name or add a domain you already own if that is the case. Take your time to think in a domain name because you can’t change it later. If you already have a business you can use the same name like yourbusiness.com.
If your name is taken, try a combination of words or letters that differentiates yours from the other. But, don’t overcomplicate it because the goal is to have something easy to remember for your visitors, clients, customers, etc.
Domains that end in .org and .net are okay but a .com adds a sense of legitimacy to your website that can’t be matched. There is also .biz, .tech, .tv, and plenty more but I don’t recommend these unless you’re desperate.
But, you don’t need to choose one right away. You can click the link to create it later and continue with the guide and select your domain later on!
Step 2.D) Fill in Your Personal and Payment Details
Once you have done all that, you will be asked to fill in your personal details. Your receipt will be sent to the email address you enter in this section, so make sure it’s correct. In the next section you can choose an account plan for one to three years, that depends on you for how long you want to have it. Just take in mind that the longer the plan you get the lower is the price.
Then you will be asked to get some extra features, I normally uncheck them all because you can use free plugins to replace those features. Finally, all you have to do is add in your credit card details (or use PayPal), whichever is easiest for you, then check the standard Privacy Policy and Terms of Service, and hit the green submit button!

Once you see your purchase was a succeed, go ahead check your receipt to see your info is correct and click on Create Account.

Then you just have to create your account and password before beginning with anything else. Make sure to create a secure password!

Then click on Login.

It will direct you to the Bluehost login dashboard and you just have to fill in your details.

So that’s quite simple, right? Just follow the instructions and you’re good to go on your way to making a professional website.
After login, the next step is very easy with a few clicks of a button to get started. BlueHost will install WordPress for you!
In this section, you have to name your site, usually the same name as your domain and set up a tagline that is basically what is your site about in a short description.
Then, if you want a blog or an online store select whatever you want, this just going to set up some extra features depending on what you choose.
But, as we are doing a website and not an online store, then choose Blog > Display Blog Post On A Different Page.

After, you have to check the boxes that correspond more to your goals.

This will direct you to select a theme for your WordPress Site. Don’t worry if you regret your choice, you can change it later.

Once you have done that, it’s all done! You will be taken to the Bluehost dashboard, you can see that there are two buttons.

Launch My Site is to make you site public to the world, you can either do it right now or wait until your website is ready with all your content, design, media, etc.
If you want to start crafting your website click on the WordPress button and you will be direct to the WordPress dashboard.
Something I like about BlueHost is the automatic WordPress install. Other hosting providers make you install it yourself and it can be time-consuming and confusing.
Before we get started, I’m going to give a brief introduction to the WordPress dashboard because I know it may be confusing at the beginning, but trust me, it’s not, you just have to familiarize with it.
I’ve highlighted the main areas you will be working with below:

Posts
Your posts are just your blog posts, or “articles.” This is where the bulk of the content that you write will live and where you can go back to edit it anytime you want.
Blog posts are generally organized by categories so that people can easily find the content that they are interested in.
For example, if you are in the health niche, you can organized your posts in categories like:
- Weight Loss
- Healthy Living
- Recipes
- Supplements
You can have however many or few categories you want on your blog!
Pages
Pages are similar to posts in that they look similar in WordPress and have the same editors. BUT pages differ from a post in that they are meant to be for more “static content” that isn’t updated frequently, such as…
- Contact page (usually has a form or email address where people can contact you)
- About Me page (about you and your website)
- Legal pages (refund policy, privacy policy, disclaimer, etc.)
Blog posts have specific purposes that usually involve educating your audience about a topic. The purpose of Pages is usually to provide more technical information about your website.
The pages are usually linked in your menus, whereas blog posts are linked on a main page or separate category pages.
Comments
This is where you can see the comments that people write on your blog posts and respond to them.
Media Library
The media library is where all of the images & videos that you upload to your site are stored. You can add images directly to the media library or you can add them directly into blog posts or pages and they’ll automatically be added to the library.
Appearance
This is where you can make customizations to your website like changing themes.
You can also create and edit your menus, sidebars, and other widgets in the Appearance section.
Plugins
A plugin is add-on software that you can install on your site to make additional customizations that are outside the capabilities of your theme.
There are both free and paid plugins and they can help you:
- Change the look of your author box
- Help speed up your website
- Add social icons and buttons to your site
- Help with website security
- And so much more!
Users
This is where you can change your email and password to your site or add other users if desired.
You probably won’t need to create new users for a while but if you ever hire a web developer or anyone else to help you design or make changes to your website, you can create new users to give them access to your site.
Settings
This is where your general website settings are, including how some things are set up and displayed on your site.

In the settings area, you can edit the following:
- Site tagline
- Email address
- Time zone and date settings
- Homepage and blog display settings
- Comment settings
- And more
The best thing you can do is just start playing around in WordPress and see what options come up to familiarize yourself with the settings.
Having that said, I hope that you understand a bit more, how the WordPress dashboard is distributed.
Now, the first thing we have to do is uninstall plugins that WordPress has by default and you won’t need.
On the left side of the dashboard go to Plugins > Installed Plugins. Once you are there, delete all the selected plugins you see in this picture.

After that I recommend you to install these four plugins because are the ones I use the most and works really well.
- Classic Editor: Is the classic WordPress editor and I like it because is easier to use, the last update WordPress made complicates things especially for beginners.
- Image Widget: Is a simple plugin that uses the native WordPress media manager to add image widgets to your site.
- Pretty Links: Enables you to shorten links using your own domain name, something that helps you look even more professional.
- Yoast SEO: Helps you get ranked higher by making your blogs and pages SEO-friendly and your content worthy of the featured position.
Getting Started With Free Themes
WordPress has thousands of FREE themes that you can access. They are great to start if you’re a beginner, but they will lack some of the tools a paid theme gives you.
If you have the extra $50 – $100 to invest, then go for a paid theme. If you feel stretched at this point, I get it. Rock a free theme for a month or so and get used to the platform.
The free theme I HIGHLY recommend is “Hestia”. It’s incredibly user-friendly, and makes customizing your first website a breeze.
Click Appearance > Themes . This will take you to the main page for WordPress free themes section, once you are here click on Add New.

Then click on the search box to search for the Hestia theme.

Click the install button.

And then, just click Activate.

Feel free to change themes as many times as you wish, as it does not affect the content you already have on there (blog posts, pages, images, etc).
If you would like to get a paid theme, my top two options are Elementor or Divi. From my experience, those are the best options in the market since they’re not just themes, but also page builders.
A page builder allows you to design your site however you want and also they have other features like pop-ups, landing pages, various pre-made templates, and more.
Trust me, you will definitely use these tools later on for your business.
If you’re still undecided on a website theme, you can also check out my article on 5 Best WordPress Themes For Beginners (Paid and Free) for some other recommendations.
So, once you’ve selected and installed a new theme, you can start changing the colors, fonts, and overall look of your website. Here’s how to get there…
Hover over your website title at the top left of the dashboard and click Visit Site (or type in your domain to the browser).

You’ll be taken to your website which now has a lot of sample text and is overall pretty empty. To start changing colors, buttons, fonts, etc. just click on the Customize button at the top of the page.

From here you have a wide variety of options to customize such as changing text & button colors, adding background images & videos, and MUCH more.
Feel free to play around in this customize menu to see how each section affects the look of your website.

How to Create A New Page In WordPress
Again, this is such an easy task, anyone can do it. Let’s say you want to create an “About Us” page on your site. All you have to do is…
- In the WordPress Dashboard sidebar look for the section called “Pages” then go down to the option “Add New”.

- You then land on a screen which will probably look to you a lot like Microsoft Word. It’s very similar in function too. You can add text, images, video, short codes and loads more.
- Once you’ve added your text that you want on the page, click the “Save Draft” button on the right menu bar and then click “Preview” to see what you’ve actually created before you publish it to “Live”

How to Add Pages To Your Menu
To show your new page in the top navigation bar of your WordPress website, you’ll need to do the following 3 easy steps.
- In the Dashboard sidebar Click “Appearance” and then “Menus”.

2. Now, just give your menu a name and click Create Menu.

3. The page that you’ve just created will be displayed in the “Pages” box to the left of center. Click on the tick box to the pages you want to be added to your menu, then click “Add to Menu”. In the “Menu Structure” section, you can move the order of the pages around by just clicking and dragging into position. When you are done, click on “Save Menu”.

Now if you visit your site, you’ll see a menu at the very top with buttons that will take you to the pages you’ve added.

How to Create Blog Post Pages
To create a blog post is the exact same process that we did to create a page.
You just have to go to the WordPress Dashboard sidebar look for the section called “Posts” then go down to the option “Add New”, and start creating your content. Simple as that!
How to Create Blog Categories
If you want to create categories for your blog posts. Simply follow this quick steps:
- To create a new category for your blog, simply go to Posts -> Categories > Add New
![]()
2. Another way is to create a blog post by doing this…. Posts -> Add New. Then with your completed blog post, you just click on Add New Category, and you’re ready to publish.

So you’ve created your category for that particular blog post.
16 Responses
That was very useful! Thanks for all the tips! Looking forward for your new posts.
I visited several websites except the audio quality for udio songs existing at this website is truly fabulous.
Wow, this piece of writing is pleasant, my younger sister is analyzing
such things, therefore Iam going to convey her.
Thanks! I am glad you find it helpful. If you need more help with this topic, feel free to send me a pm.
Pretty element of content. I just stumbled upon your blog and in accession capital to
say that I acquire actually loved account your blog posts.
Any way I’ll be subscribing on your augment or even I achievement you get entry to constantly fast.
my site: Cogni Max
I like what you guys tend to be up too. This type of clever work
and coverage! Keep up the excellent works guys I’ve incorporated you guys
to blogroll.
Your welcome!
An impressive share! I’ve just forwarded this onto a coworker who had
been conducting a little research on this. And he actually ordered me dinner simply because I discovered it for him…
lol. So let me reword this…. Thank YOU for the meal!! But yeah, thanks for spending some
time to talk about this matter here on your web site.
hahah glad I could get you a free meal.
Ahaa, its nice dialogue regarding this article at
this place at this blog, I have read all that,
so now me also commenting here.
I know that I am as smart and as willing to make money anyone else.
You want to remain on top of consideration and greatest ideas that are being presented daily.
You must keep pace with video marketing production.
This article will assist the internet people for creating new website or even a blog from start to end.
I was more than happy to find this web site. I want to to thank you
for your time just for this fantastic read!! I definitely appreciated every part
of it and i also have you book marked to look at new things in your site.
I am really loving the theme/design of your web site.
Do you ever run into any internet browser compatibility issues?
A handful of my blog visitors have complained about my blog not operating correctly
in Explorer but looks great in Safari. Do you have any solutions to help fix this issue?
Whats up are using WordPress for your blog platform?
I’m new to the blog world but I’m trying to get
started and create my own. Do you need any coding knowledge to make your own blog?
Any help would be really appreciated!
Feel free to visit my web-site; bayrakavm.com
I’m using wordpress with elementor. Here is a training that shows you how to do it step by step. Hope it helps. https://jordanvelasquez.com/trainings/